Data Guardian Manual
Our manual is always expanding! While we strongly believe our products are so intuitive you shouldn't need a manual, there are exceptions now and then. If you feel something is missing from the documentation, please contact us.
Accessing the Home Database
- Choose "Open Home Database" from the File menu.
Adding Password Protection
Your database is not secure from prying eyes, nor encrypted, unless password protection is applied. This password encodes and decodes your information on the fly when you open and save your database within Data Guardian. It is very important to note that your database cannot be recovered if it has been encrypted and the password is forgotten. The data is dynamically encrypted based on the password chosen, and using any other key to try and decrypt it would result in gibberish.
- Open the database to be password protected.
- Choose "Password Protection..." from the File menu.
- Enter your desired password twice and click OK.
- Save your database.
Automatic Site Login
Data Guardian cannot auto-fill web forms in a desktop web browser such as Safari, FireFox, or Chrome. However, the iOS version can auto-fill in Safari using the new Passwords feature in iOS 12. For all other types of services, such as FTP, the following method can be used to connect to servers with auto-fill.
On macOS
- Turn on the "Use username and passwords when opening URLs" option in the Security tab of Preferences.
- Create a record with a field labeled username or login.
- Create another field with the type of Password.
- Create a final field labelled URL.
- Fill in the applicable information, remembering to include http://, ftp://, hotline://, irc:// and so forth in the URL.
- Save, and click the Go (>) button.
- Repeat steps 1 through 6 as necessary for all desired records.
On iOS
- Open the system Settings app
- Click "Passwords & Accounts"
- Click "AutoFill Passwords"
- Put a checkmark next to "DataGuardian"
- Use Safari as usual and the password suggestions will display as normal.
Automatically Open a Database at Launch
The Home Database is a database that can be automatically opened when Data Guardian launches. This can be easily changed or disabled in the Preferences window. In older versions of Data Guardian (and Password Retriever), it was automatically created and stored in your Documents folder as "Primary Database.prdb". In newer versions it is a .dg3 file.
- Choose Preferences from the Data Guardian menu (Mac) or Edit menu (Windows).
- Click the General icon in the toolbar.
- Click the drop-down menu next to the Home Database label and press "Select..."
- Locate the alternative Home Database and click Choose.
- Ensure the "Open this database on launch" checkbox is enabled.
Automatically quit after a duration of no activity
For security purposes, Data Guardian can be told to discard any changes to currently open databases and quit after a length of time of no computer activity. "No activity" is determined based on if the mouse was moved. However, if there are any modal dialogs onscreen, the program will also not quit.
- Choose Preferences from the Data Guardian menu (Mac) or Edit menu (Windows).
- Click the Security icon on the toolbar.
- Check "Discard and quit when idle for __ minutes".
- Enter the duration of idle time that must pass before the program quits.
Bulk Editing
At times, after creating numerous records, you realize that it might have been in your best interest to edit or delete a field for all of them. It would be a pain to go through each record manually one at at time adding or removing the field. The Bulk Edit feature allows you to rename, delete, or modify the type of fields for the selected records.
- Select the records in the main window which will be changed.
- Choose "Bulk Edit" from the Record menu.
- Check the checkboxes next to any of the options you'd like to change on the selected records, and then choose the new value.
- If you wish to modify field contents, names, kinds, click the plus (+) button below the empty list.
- Choose the name of the field to modify. If the field does not exist within the selected record, it will be left untouched.
- Check off and specify new values for any of the properties of each field, be it the name, type, or contents. You may also delete any fields matching that name by checking the last box.
- Click Change.
If you have opted to change the name of a field for records and a field by that name already exists, the name will not be changed. Also, if you currently are editing a record and the fields have just changed because of the Bulk Editor, it is advisable that you click the Revert option in the window or the new bulk effects will not take effect when the record is saved.
This action cannot be undone if the database is saved. If the changes made are undesired, close the database without saving and re-open it.
In addition, you may wish to enforce a preset. Doing so erases fields from the record in question which do not exist in the preset, and adds fields which do not exist in the record but do in the preset. Filled in fields which are in both the preset and record are preserved.
Changing List View Options
If you've defined custom fields for records, you'll notice that the only data you see in the list is the record name, and some empty columns. You'll need to replace those empty columns with ones applicable to the contents of the viewed records.
- Right-click the "Name" column at the top.
- Ensure only the applicable fields are checked.
- Click OK.
Changing the Random Password Generator template
The Random Password Generator creates new passwords based on a dynamic template.
- Choose Preferences from the Data Guardian menu (Mac) or Edit menu (Windows).
- Click the Security icon on the toolbar.
- Enter a new template in the text field.
The template for the Random Password Generator uses variables to determine the pattern in which passwords are generated.
| Variable | Effect |
|---|---|
| [!] | becomes one of: !@#$%^&*() |
| [#] | becomes a number between 0 and 9 |
| [a] | becomes a lowercase letter |
| [A] | becomes a capital letter |
| [@] | becomes any random letter, number, or one of !@#$%^&*() |
Use [5-A] to return a random set of five uppercase letters, [11-#] to return eleven random numbers, and so forth. To return a random number of characters, specify the range for the length count (ie. [1:9-a]). This will return anywhere between one and nine random lowercase letters.
Any character which is not one of the above special characters will be treated literally. For example, a template like: [2-@]Adam[A][4-#] could return a value like: $&AdamX1984
Collection
Collections are used to organize groups of records in one easy to manage area.
- Click the "Add" button (+) below the collections list.
- Choose "New Collection" from the popup menu.
- The new collection will appear in the sidebar. Rename it as desired.
- Drag records of your choice into this collection.
Additionally, smart collections can automatically include records based on search criteria - much like Apple's smart folders. It is important to note that records cannot be manually added to smart collections.
- Click the "Add" button (+) below the collections list.
- Choose "New Smart Collection" from the popup menu.
- Specify the rules which must be met for records to automatically appear in this collection. Click the plus (+) icon to add a new condition.
- Choose whether all rules, or any of the rules, must be met.
- Click OK.
Creating a Database
Enjoy having numerous databases to separate private data, or simply for organizational purposes.
- Select "New Database>Standard Database" from the File menu.
- Populate the database and save it to any desired location.
- Simply double click the database later to reopen it.
Creating a Database Template
- Configure a blank database to include all the collections and presets desired.
- Choose "Save As Database Template" from the File menu.
- Specify a name and click OK.
- Close and do not save the database just configured.
- Choose "New Database" from the File menu, and select the name of the template just created.
Creating Records
Records are records within Data Guardian which store data. Each may have its own custom fields and be stored in different collections. Those steps are covered later in the documentation.
- Choose "New Record..." from the Record menu and select "Blank" from the submenu.
- Fill in the desired information and click Done.
The Private checkbox will ensure the record is not touched during a synchronization process.
Changes to records are not permanently saved to the database until the database itself is saved as well. To do this, close the new record window and choose "Save" from the File menu.
Database is missing or reporting error -69 on launch after updating
If a preferences file has become corrupt, or invalidated due to an update, basic program settings may need to be reconfigured. This is easily fixed, simply go into Spotlight (Mac) or Windows Search and search for the .dg3, .dgdb .prdb file. After locating the file, follow these steps:
- Open the file from the folder it is located in (usually the Documents folder of the current user).
- Once open in Data Guardian, go into the General tab in the Preferences.
- If the file is NOT already selected beside the "Home Database:" text, click "Choose", and find the file and click "Open".
- Click the "Open Home Database on Launch" box.
Date Checking
One of Data Guardian's field types is a date field. Date fields have the additional option of being scanned either at database open or an interval to see if they are approaching. Configuration for the Date Checker is done globally in the Preferences window.
- Choose Preferences from the "Data Guardian" menu (macOS) or "Edit" menu (Windows).
- Click the "Date & Time" toolbar icon.
- Enter the Scope for how many days in the future you wish to scan for upcoming dates.
- Close the Preferences window and open the database to be checked.
- Choose "Check Dates" from the Record menu.
Enabling "Every __ minutes" will scan through all of the records every open database at the interval specified. The first check executes one time unit after the database was opened.
- "On database open" will check for upcoming dates once when a database is initially opened.
- "Show empty date notice" will display error messages after dates have been checked and there were date fields within records that were not set.
- "Dates valid every year" disregards the year portion of a date field during check. This is the feature to enable if the date fields contain birthdays, or other annually recurring events.
Defining Record Fields
When a database is first created in Data Guardian you will notice that there are already some presets installed. You can also create some of your own!
- Create a new database, or open a pre-existing one.
- Create a new Blank record by going to "New Record...>Blank" in the Record menu.
- Click the small black arrow next to any existing field and click "Add Field After..."
- Define the Field Type and Field Name. Repeat as many times as desired. Field names must all be unique and not be one of the few reserved names.
- Click "Done".
- With the fresh record window foremost, choose "Save As Preset..." from the Record menu. Enter a preset name, and click Save.
- Close the record window, and do not save.
- Choose "New Record" from the Record menu, and select the preset that was just created. It is important to note that presets are only available to the database they were created within. To create an encompassing database template, see the instructions below.
Export Variables for HTML or Text
| Tag | Validity | Description |
|---|---|---|
| [DGMain:DatabaseTitle] | Header, Footer | Title of your database |
| [DGMain:ItemCount] | Header, Footer | Total items exported |
| [DGMain:HomeURL] | Header, Footer | URL to the first page |
| [DGMain:TotalPages] | Header, Footer | Total pages exported |
| [DGMain:TotalPageItems] | Header, Footer | Total number of items on this page |
| [DGMain:CurrentPage] | Header, Footer | Current page number |
| [DGMain:NextPageURL] | Header, Footer | URL to the next page |
| [IfNextPage] [ELSE] |
Header, Footer | Wrap around the entire block of HTML that should appear on the page if there is a next page. |
| [DGMain:PrevPageURL] | Header, Footer | URL to the previous page |
| [IfPrevPage] [ELSE] |
Header, Footer | Wrap around the entire block of HTML that should appear on the page if there is a previous page. |
| [DGItem:Name] | Body | The record name |
| [DGItem:Record Image] | Body | Record image |
| [DGItem:Date Created] | Body | Date the record was created |
| [DGItem:Time Created] | Body | Time the record was created |
| [DGItem:Date and Time Created] | Body | Time the record was created |
| [DGItem:Date Modified] | Body | Date the record was Modified |
| [DGItem:Time Modified] | Body | Time the record was Modified |
| [DGItem:Date and Time Modified] | Body | Time the record was Modified |
| [DGItem:Date Synchronized] | Body | Date the record was Synchronized |
| [DGItem:Time Synchronized] | Body | Time the record was Synchronized |
| [DGItem:Date and Time Synchronized] | Body | Time the record was Synchronized |
| [DGItem:Private] | Body | Yes/No if the record is private |
| [DGItem:Locked] | Body | Yes/No if the record is locked |
| [DGItem:File Count] | Body | Number of files attached to the record |
| [DGItem:File Names] | Body | Names of the files attached to the record |
| [DGItem:*] | Body | Replace the * with any field present in the record. This will be replaced with blank text if it does not exist. |
Exporting
Creating export templates
Data Guardian can export to numerous formats. However, the most important is HTML. Creating new templates for both of these formats is relatively easy if you have experience with a text editor. Of course, creating an HTML template requires knowledge of HTML as well. Once installed, templates are stored in the Application Support (macOS) or Application Data (Windows) folders.
- Create a new folder on your desktop with the new name of your template.
- Create a basic design for the template and save it into this new folder as index.html. Any and all required images for this design must go into a folder called "images".
- Open index.html and put a [item] and [/item] tag set around the area which will contain the template for the item details. Then, customize the item details area with any of the tags specified below.
- The content within the [item] [/item] area will be duplicated as many times as the item count per page (as specified by the user in the Export dialog). For instance, if the user is exporting 100 records, and specifies 3 records per page on export, the HTML that will be outputted will be in a single file containing: the top of the page, [item] content, [item] content, [item] content, and the end of the page. Additional copies of this page will be created until their entire count has been exported. In this case, 34 pages for records will be created.
- In index.html, right after the opening [item] tag, include a [settings] and [/settings] tag set. It will be removed from the final product, but will prevent the template from being loaded if it does not exist. Example:
Example:
[settings]
[imageHeight]64[/imageHeight]
[imageWidth]64[/imageWidth]
[fillColor]#RRGGBB[/fillColor]
[/settings]
The top two tags are for you to specify the maximum width and height of record image if you used a [DGItem:Record Image] tag within an [item] tag set. If a [fillColor] (optional) is specified, the image will be exported and if it cannot be scaled down proportionally to fit exactly to the bounds specified, filler color will be used around the edges. Otherwise, an image of "best fit" is exported. The width and height of this image may be smaller than the [imageHeight] and [imageWidth] specified, but never larger. - Optionally, you can create a preview.html file to enable the template preview option in the Export window. Store images for this template in a different folder than "images". This way they will not be copied over to the final product. Also, a style.css will be copied over as well if one exists.
- Launch Data Guardian and open the Export window.
- Click the HTML tab, and press the "Install New..." button.
- Choose the folder you just created for your template. It will then be added to the templates popup menu if it was created successfully.
- Perform an export as desired using your new template!
Export records to iPod touch or iPhone
- Connect the iPod or iPhone to the computer.
- Choose "Export..." from the Record menu on the computer.
- Click the iDevices button on the toolbar.
- Specify a Database Name, and check the fields to export.
- Select the iPod or iPhone in the device list and click Connect.
- Choose Upload.
- The database should now appear on the iPod under the Notes section.
Extra Fields Keep Appearing When Loading Preset Templates
To fix this go into "Preferences" menu and in the "General" tab and choose " Preserve original values and auto fill for new fields". It will delete any fields that do not exist in your preset.
Feature Requests
Import/Export/Sync
- Easy way to import/export DG record format.
- Remember import/export settings.
- Ability to synchronize with .Mac or iPod.
- Save import/export settings.
- Import should be "smarter" and auto-align fields and types based on name/content.
- Sync over iCloud.
- Sync. needs delete option.
- Sync same-name records to most recent version and keep a log of record deletions, and provide the option of synchronizing deletions as well.
- Dropbox/iCloud Support.
- Export collection name as a column.
iOS Version
- TouchID support.
- Add ability to delete databases when the password is forgotten.
- Auto-lock when backgrounding on iPhone OS 4.0.
- "Big" font size for easier UI readability.
- Perhaps put field names above content.
- Copy Password option may not work.
- Custom collection icons.
- Is UFT8 fully supported?
- Landscape mode.
- Retain field values when loading a preset.
- Change Checkbox on/off label.
- Add separator field, some other fields will not display copy/cancel popup when clicking.
- Picture: support zoom stored picture... or link directly to library on the iPhone?
- portrait & landscape modes.
- Data Guardian is where I store all of my passwords but it is inconvenient to use at times. At times I dont want it to close when the phone sleeps especially if I am paying bills and so on, so I turn off the auto-lock. However, that means I either have to go into the settings and turn them back on or close the app completely by using the iOS to kill the app. It would be convenient if there was a button on the database page that would allow you to exit the database and manually lock it. Also it would be convenient if it didn't stay in he background when locked.
- Share mySQL database with desktop version.
Collections
- Custom icons
- The ability to assign a default "preset" to each collection, so when creating a new record while viewing a certain collection, the desired preset will be used.
- Move records between collections.
- In the main window, add a third pane like Apple's Address Book to show record information instead of spawning a new window.
- Manual sort option for records and collections list.
Printing
- "Select All Fields" button
- Title of collection should print in "As displayed".
- If printing As Displayed, overflow should print on other pages (horizontally).
- "A couple features that would be very helpful would be that the "Print as Displayed" feature has controllable text sizes and types so that landscaped printing would allow more space. Current default does not allow a lot of fields to be printed in landscape view. Also, it would be ideal if the printing portion also contained a preset option whereby a Collection could have a defined set of views (via a preset drop down) to print with specific fields, so that each time printing requirements changed, there is no need to go through and check or uncheck fields, rather, just choose a different preset."
Records
- Use a different font to differentiate between O and 0, l and I.
- Drag reorder fields
- Contextual menu for fields should yield a convert field type option.
- Ability to change size of the notes window.
- Voice Entries (QuickTime).
- Field text masks.
- Calculation field.
- Auto-fill fields.
- Press a button and containing collections are highlighted.
- Automatically deselect the current line and always select and jump to the newly entered record.
- User-defined keyboard shortcuts for login/password fields.
- Include a numeric field for sorting and for searching by range.
- Save window positions and dimensions.
- Link to a file on disk instead of importing into the database.
- Export to include additional column which lists which collections a record belongs to.
- OneTimePassword support
General
- Add separators in the Quick Browser.
- An option to center the data screen top center on the master screen by default when using multi displays.
- Save & Quit after x minutes.
- Tray/menu icon.
- Add Incremental Search to Quick Browse Window.
- New multi-column sort options (sort by first, second, and third).
- Support for nested groups.
- Ability to view images attached with the Files button. Alternatively, add the ability to view a full image attached to a record with the Picture field, rather than just the thumbnail.
- Ability to disable the Black Glass theme in the Quick Browser as well.
- Ability to increase the text size in each individual record window instead of an overall text size increase.
Field Types
Data Guardian supports a variety of field types for easily storing data in an applicable format. Some of these are as follows:
- Normal Text
- a single-line field for basic data like a login, serial number, or so forth.
- URL
- a blue and underlined single-line field with a Go button next to it to launch the URL. Launches the applicable application to handle the type of URL specified. For example, your FTP client will be launched for addresses beginning with ftp://.
- E-Mail Address
- a blue and underlined single-line field with a Go button. The Go button launches your computer's mail client and addresses a blank message to the specified address.
- Phone Number
- a green and underlined single-line field for phone numbers with a Dial button. Supports letter dialing such as: 1-800-4KO-INGO. When pressed, the Dial button uses the modem in the computer to dial the number on the connected phone line. A modem must first be specified in the Preferences window.
- Large Text Field
- a field supporting multiple lines of text (useful for notes). The scollbar becomes active if numerous lines of text are entered.
- Password
- secure field for storing passwords. Text cannot be copied or pasted from this field when the contents are hidden. This field is also used to help auto-fill logins & passwords when the Go button is clicked if the appropriate option is checked in the Preferences window. Toggle between secure and unsecured mode by choosing the Hide or Show button next to it. In addition, also includes a Randomize button which generates a new random password based on the template in the Preferences window.
- Date
- a field which contains a static date such as a birthday, join date, anniversary and so forth. The included Set Date button will bring forth a Calendar window in which to set or clear the date. Date Checking options are configurable in the Preferences window.
- Picture
- a field used to store an small 64x64 pixel image. Drag and drop an image to this field, or use the Set Image button to insert content. This field can also act as the icon for the record if the "Use this image as the record icon" option is checked. This is only available for the first picture in the record.
Import records from a text file
Data Guardian can import a variety of data formats from flat text files. This includes, but is not limited to, tab-delimited, CSV and Koingo Software Contact Keeper 4.x database files.
Importing from a regular flat text file
- Open or create a database for the results of the import to be placed.
- Choose "Import..." from the Record menu.
- Click the Text button on the toolbar.
- Choose both the Field and Record Delimiters, or specify custom values.
- Choose the destination ("Map To") for each field in the rows below.
- Choose the type of field which will be created for each row.
- Use the "<" and ">" buttons to navigate through the records in the file, ensuring the fields have been properly "mapped."
- Click Import.
Fields which are not assigned will not be imported (unless importing a Contact Keeper database and "Import empty fields" is checked).
Introduction
Data Guardian allows you to securely store information in a database. It is customizable enough to allow input for a variety of data types. Use it as a secure customer database, journal, inventory, and more!
In order to secure a database, password protection must be applied. Without password protection, the database is NOT encrypted. When encrypting, the password is used to encode the data in the file. Only that password can be used to load the file next time; without it, the data is unrecoverable.
When Data Guardian is first launched, a blank database is created and will later prompt you to save. If desired, a database which loads at program startup can be specified in the Preferences window.
Known Issues
Desktop Version
- HUD display when copying items on Windows is not HIDPI savvy.
- Mavericks (macOS 10.9) does not allow Keychain export to auto-fill in Safari. This is a change by Apple to move to iCloud. They currently do not provide a public API for developers to integrate with this. We will add it as soon as Apple premits.
- http://www.grafxlut.com/DG-cohn.mov
- Import vCard to support unicode characters proper.
- If you have a date set in the calendar that is NOT today in the same month and then click today the selection rectangle does not update. It stays on the previous date, but the actual selection is set to today.
- Importing into 1Password will duplicate record entries instead of syncing them. We've asked 1Password for a fix to this.
- Tab character messes up .csv exports.
- UTF-8 does not get respected for .csv exports.
- Possible memory leak if app left open for a long time? Maybe has something to do with autosave?
- If you store the DB password in keychain, move the entry into a new Keychain Data Guardian will delete and recreate the "login" Keychain next time you access your database.
- Sometimes main window can go below min size
- Password hint
iOS Version
- "I'm using a DataGuardian on iOS 9.2 and there's a problem with label colors. I've always create the main data base on os x 10.11 and sync with iOS version. The problem is the labels color in iOS app always change to green thought i use many labels."
- Sometimes crashes when searching on iOS 6
- iOS version does not properly support unicode passwords
- Does not match same format as desktop version (SQLite)
- Slow startup for databases with 1000 records or more
- Does not handle desktop record pictures
- Does not handle desktop record attachments
- Does not have a smart "Trash" collection.
- Smart collections do not sync
- Cannot drag/drop database into iTunes on the mobile Data Guardian area
- Cannot edit fields in-line for text types after clicking Edit
- Password fields do not show popup menu
- If "Show Icon" for recod is OFF, and there *is* a picture field in the record's fieldset, the default record icon should show; however, a white rectangle is shown instead.
- "Duplicate" does not save the recordLabel setting.
- Presets do not save the slider min/max values, like they should.
- Presets do not save the selection menu options, like they should.
- Date fields are calcuated incorrectly. In the desktop version it shows: November 16, 2004. In the iPhone version it shows: Nov 15, 2004.
- With "Lock on iPhone sleep". It sometimes does not lock after the iPhone goes to sleep (I tried quite a number of times but I was not able to identity when it locks when it doesn't). And apparently it does not lock if I press the power button to switch off the screen.
- If I duplicate a record. The record stays at the corresponding collection. However, if I exit the database and reopen the it, the record is not in the original collection anymore. It's now in the unfiled collection. Further, if I assign a different collection to this duplicated record, the collection information is gone (ie, the record goes back to unfiled) if I leave and reopen the database.
- Database does not auto-save after editing a record. Should commit changes to disk.
- Don't show ability to remove fields when clicking Edit in the Records window, make a separate button that does this.
- Make creating records from a preset by default easier
Passwords Appearing as Black Dots
When Data Guardian is launched for the first time, the setting to hide passwords by default is automatically turned on. This means that passwords in the main list, and password fields inside records will appear as black dots instead of showing the actual password. To globally turn this feature off, choose "Show Passwords" from the "View" menu. It is also possible to show and hide passwords temporarily on-the-fly by clicking the Hide or Show button next to a password field inside a record.
Prevent the Home Database from Opening at Launch
- Choose Preferences from the Data Guardian menu (Mac) or Edit menu (Windows).
- Click the General icon in the toolbar.
- Uncheck "Open this database on launch".
Private Records
Records can be set as "Private" in the record editor. This means the record will be left untouched during synchronization and not copied. Private records can also be hidden in the main list by choosing "Hide Private Records" from the View menu.
Quick Browser
The Quick Browser is a window which allows you to, quite literally, quickly browse the contents of your database. Data can be dragged and dropped out of the Quick Browser into web sites, and also other programs.
Show the Quick Browser:
- Open the database for which you wish to use the Quick Browser with.
- Choose Quick Browser from the Window menu.
- Use the arrows to navigate through the records, or option-click an arrow to have the Quick Browser scan through the records for you. Simply click Stop when you're on the one you want.
We realize that you can't constantly be switching back and forth between applications to view the Quick Browser. That's why it also comes as a floater!
Make the Quick Browser Float Above All Windows:
- Choose Preferences from the Data Guardian menu (Mac) or the Edit menu (Windows).
- Click the "Records" button on the toolbar.
- Uncheck "Quick Browser does not float over all windows".
- Close and re-open the Quick Browser.
Random Password Generation
Paranoid about security, or simply need a random password really quickly?
- Choose "Password Generator" from the Window menu.
- Click the "Generate" button and a new code will be instantly generated.
You will soon notice that there is a certain pattern to all the passwords generated. It is possible to define your own custom template for password generation instead of the default we have provided. Passwords can also be generated by clicking the "Randomize" button (in the drop-down menu) in each record window.
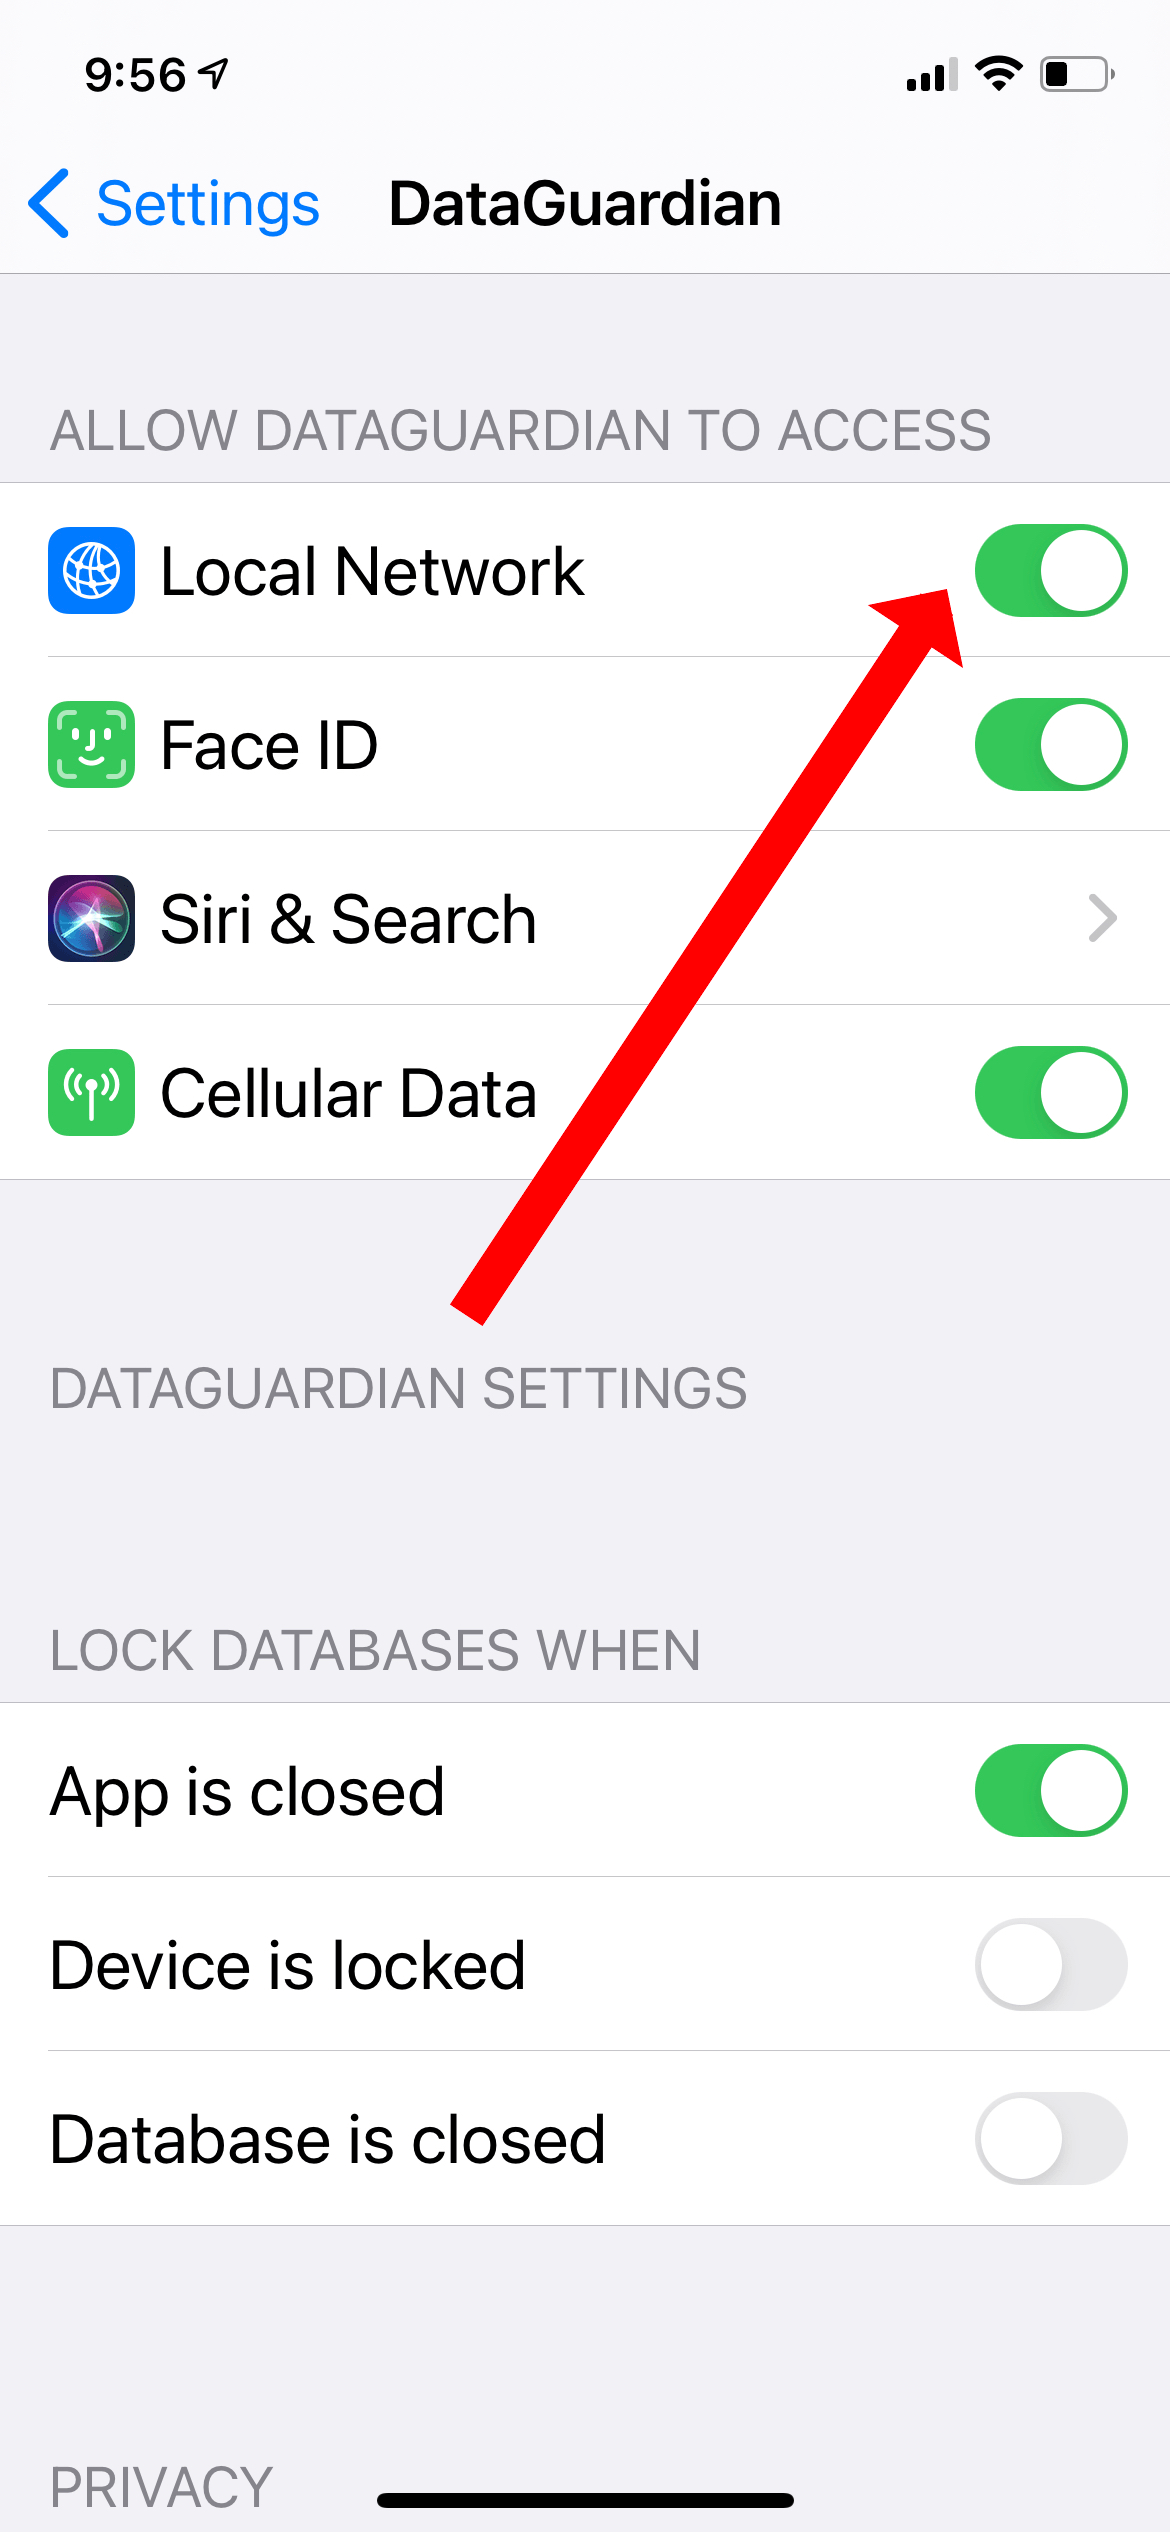
Synchronizing Database with iOS
Before syncing open "Settings" on iOS and go into "Data Guardian." Ensure that "Local Network" is turned on. Also ensure that any VPNs or firewalls (such as Little Snitch) are turned off on the desktop computer.
How to Upload or Sync a Database
- Open your database in the desktop edition of Data Guardian.
- Select “iOS Synchronize…” from the File menu.
- Connect your iPhone to the same Wi-Fi network as your computer or use a USB cable.
If you have neither Wi-Fi nor USB available, or if your home network blocks devices from seeing one another, follow these steps to work around this restriction:- Enable Personal Hotspot on your iOS device via Settings.
- Connect your computer to this personal hotspot.
- Open Data Guardian on the iOS device and remain on the main Databases list screen.
- Wait for your iOS device to appear in the devices list on the desktop edition.
- Click “Upload” or "Synchronize"
How to Perform a More Advanced Synchronization
- Open the existing copy of the database on your computer.
- Download the database from your iOS device to the desktop (using the steps above but using the Download button instead of Upload).
- Open the newly downloaded copy of the database (so both original and new copies are open).
- Select “Synchronize Databases…” from the File menu.
- Save both databases after the sync is complete.
- Re-upload the database to your iOS device by following the Upload steps above.
Synchronizing Databases
Data Guardian can synchronize two databases together, so that records are up to date on both. The databases can be of different origins and be being syncrhonzied for the first time.
Records are matched up based on name, and if there is more than one record with the same name, they are left untouched. Additionally, records marked as Private are left in their respective databases without being synced.
- Open both databases you wish to sync in Data Guardian. If one of the databases is on a network file server, connect to that server, and open the file in the local copy of Data Guardian.
- Choose "Synchronize..." from the Record menu.
- Choose the database you wish to sync with from the "Other Database" drop-down menu.
- Click Synchronize.
- Both databases are now updated. Review both open database windows to ensure the changes are what you expected, and then save the changes.
Transfer Database to a Different Machine
- Open the database in Data Guardian.
- Choose "Save As" from the "File" menu.
- Copy this newly saved file to your new machine.
Alternatively, commonly the Primary Database is stored in your "Documents" (on Mac) or "My Documents" (on Windows) folder. Just move this over to the same location on your new machine.
Upgrading from previous versions
As of Data Guardian 1.7, legacy update options have been removed. Please follow one of the update options listed below to convert your database and bring it into the newest version.
Easiest way to update from a very old version
Do a direct text export and reimport into the new version. For example, in Password Retriever 4.1.5:
- Open your database.
- Choose "Export" from the "Services" menu.
- For "Field Delimiter" choose "Other" and specify something very unique that would never occur in any of your records like: $$$***(((
- For "Record Delimiter" choose "Other" and specify a different unique string of text like: @@@:::^^^
- Click the "Export" button and save the file to your desktop as "Old Version Export.txt".
- Quit Password Retriever.
- Launch the latest version of Data Guardian.
- Create a new blank database, or open an existing one.
- Click the "Record" menu and choose the "Import" option.
- Click the "Text" import option on the toolbar.
- From the "Field" and "Record" delimiter popup menus, choose Other and specify the unique tid-bits you entered in Password Retriever earlier. Be sure to enter the correct one in each field.
- Press the "Open" file and choose "Old Version Export.txt" on your desktop.
- The first record from the file will be shown in the list below if the parse was successful.
- Choose the new name for each field under the "Map To" column. If the field does not already exist, choose the "Other..." option and specify a new name.
- Choose the desired field type for each row as well.
- You only need to specify the "Map To" and "Field Type" for all the rows in the first record. The settings will carry over to all the other records during import.
- Click the "Import" button, and verify the import was successful.
- Save the database via the "File" menu to a location you will remember, and even set it as your "Home Database" in the Preferences window if desired.
- You can now safely trash the old version of our product and its old database file(s).
Password Retriever 1.9 to latest version of Data Guardian
- Open your database in Password Retriever 1.9. By default, your database is a folder stored in your Preferences folder called "Password Retriever Data"
- Ensure none of your records contain any line breaks in the "Notes" field or any tabs (this will ruin exporting).
- Choose "Export" from the "File" menu.
- Click the "Tab" button then click "Export"
- Save the exported text file anywhere on your computer.
- Download, install, and launch the latest version of Data Guardian.
- Create a new database in Data Guardian and choose "Import" from the "Record" menu.
- Click the "Text" tab on the toolbar.
- Click the "Open" button and choose the file we just exported.
- Leave the field delimiter as tab, and record delimiter as linebreak.
- For the first record only (which should be shown below), specify a "Map To" and "Field Type" for each row as defined below. If the field name is not available in the "Map To" popup, choose "Other:" and a window will popup asking for you to manually enter the name.
- Row 1: Name/Normal Text
- Row 2: Login/Normal Text
- Row 3: Password/Password
- Row 4: Reminder/Normal Text
- Row 5: URL/URL
- Row 6: PIN or Serial/Normal Text
- Row 7: Notes/Large Text Field
- Press Import and save the new database.
- Throw away all the old files.
Password Retriever 3.7.2 through 4.1.5 to Password Retriever 4.6.3
- Open your database from versions 3.7.2 through 4.1.5 in version 4.1.5 and choose "Exported Database.pwr45" from the "Services" menu.
- Quit 4.1.5 and download, install, and launch version 4.6.3.
- Choose "Update" from the "Services" menu and select the "Exported Database.pwr45" file.
- Save the new database.
- Throw away all old files.
Password Retriever 4.5.3 through 4.6.3 to Password Retriever 5.3.5
Version 5.3.5 is the last version of Password Retriever before it became Data Guardian.
- Download, install, and launch version 5.3.5.
- Create a new database and choose "Update Old Database" from the "File" menu.
- Press "Select" and choose your old database, and update.
- Save the new database with the file extension .prdb.
- Throw away all old files.
Password Retriever 5.3.5/Data Guardian 1.0-1.19 to latest version
- Download, install, and launch version 1.6.5.
- Choose "Open" from the "File" menu.
- The database will be automatically updated to a format that works in version 1.2 and later.
- Save the database with the new file extension .dgdb.
- Quit 1.6.5 and download and install the most recent version of Data Guardian.
- Open the new .dgdb file.
- Throw away all old files.
Files and Locations
- Version 1.9 (Mac OS 9): Macintosh HD/System Folder/Preferences/Password Retriever Data
- Version 1.9 (macOS): Home/Library/Preferences/Password Retriever Data
- Versions 3.7.2 through 4.1.5: Home/Library/Preferences/Password Retriever Services
- Versions 4.5.1 through 4.5.1: Home/Library/Preferences/com.koingosw.pwr4.services.txt
- Versions 4.5.4 through 4.6.3: Home/Library/Preferences/com.koingosw.pwr4.services.pwr
- Versions 5.0 through 5.3.5: Home/Documents/Primary Database.prdb
- Versions 1.0 to 2.x: No specific home location. File extension is now .dgdb
- Versions 3.0 of Data Guardian and higher: No specific home location. File extension is now .dg3